- Rename the older Windows installation folder to Windows.old
- Now run the disk clean up by right clicking the drive where the old Windows folder exists.
- During disk cleanup select clear system files.
- Now it will detect that there is old Windows folder which can be cleaned.
- Select the Older Windows installation files and complete the disk clean up.
- The Windows.old folder will get deleted automatically.
How to delete old Windows installation folder
To delete the older Windows installation folder you will have to let windows know that its older installation and clean it using disk cleanup.
Error : file .ps1 cannot be loaded because the execution of scripts is disabled on this system
During execution of powershell script you may face the error "File .......ps1 cannot be loaded because the execution of scripts is disabled on this system."
This is because the script execution is by default disable. You will have to enable it to execute the powershell scripts.
To enable the script execution run following commandlet on powershell.
Set-ExecutionPolicy Unrestricted
OR
Set-ExecutionPolicy Unrestricted -Force
For more information please refer the here Running Windows PowerShell Scripts.
Windbg: The call to LoadLibrary failed, Win32 error 0n193
While analyzing the managed process dump you may get the error as below:
The call to LoadLibrary(C:\Windows\Microsoft.NET\Framework64\v4.0.30319\sos) failed, Win32 error 0n193
"%1 is not a valid Win32 application."
Please check your debugger configuration and/or network access.
On of the major reason of this error could be :You might be debugging 64 bit process dump using 32 bit debugger. Try using the 64bit debugger.
You can side by side install and use the 32 bit and 64 bit debugging tools for Windows.
Once you have chosen the correct Windbg version, first try executing the command
.loadby sos clr
before starting your dump analysis.
Error : maximum number of update rollouts reached
You may get error "maximum number of update rollouts reached" while updating your Galaxy S4 over the phone.

If this error appears frequently then install Samsung Kies on you computer/laptop and then try to update the device software.
Once you install the Kies on your PC, connect the mobile to PC. If Kies successfully connects to your device then it will automatically detect the software version on the device and if update is required it will prompt your for the device software update.
Removing duplicate images and videos from Gallery on Samsung Galaxy S4
If you are seeing duplicate images or videos in gallery of your Samsung Galaxy S4 or any other Android 4.2.2 running device, then you can easily clean up those with a simple trick.
Go to Settings -> More -> Application Manager.
Under All Applications, select for Gallery app. Now click on "Clear Cache" and then "Clear Data". Follow similar steps for the Media Storage app as well.


Now restart your mobile. Once restart complete, wait for some time so that media service will search for the images, video and other media sources.
Now open the Gallery application, all the duplicate images, videos should disappear.
Samsung Galaxy S4 GT-I9500 : Hard reset
Note: Make sure you backup your data and application before using steps below, as hard reset will result completely wipe your data and applications.Also make sure you have your phone battery fully charged.
There are multiple ways to hard reset your Galaxy S4.
- Using factory reset option
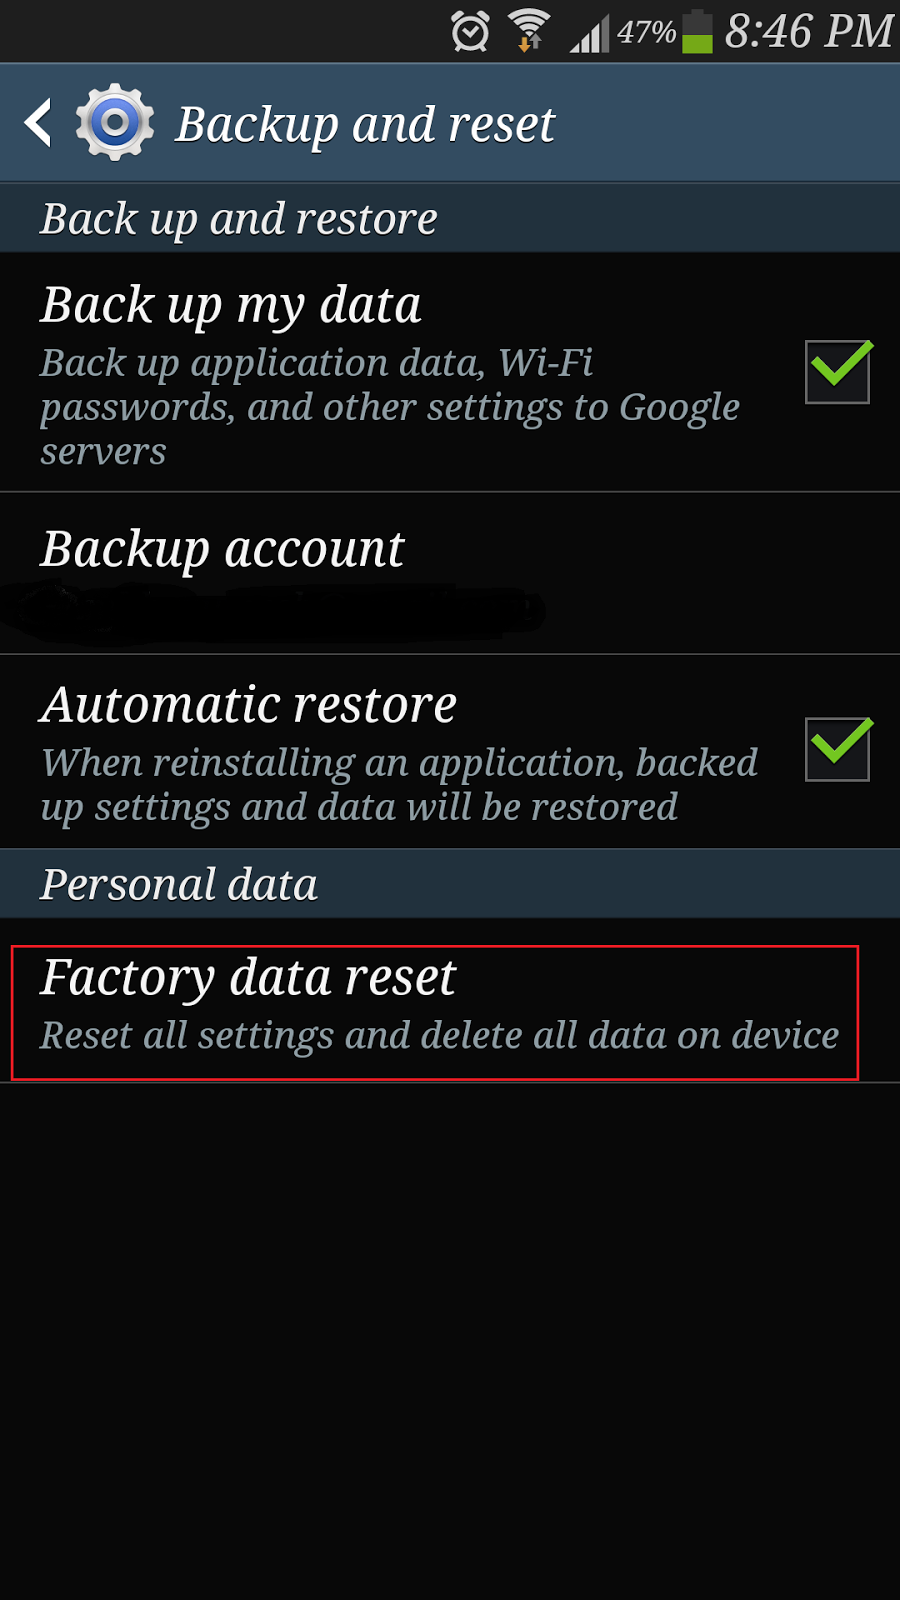
Go to System -> Account -> Backup and Reset -> Factory data reset -> Reset Device -> Erase everything on your mobile.

- Using Galaxy S4 recovery mode
Enter to recovery mode using steps mentioned in the post How to enter to recovery mode.
Once you are on recovery screen select Wipe data /Factory reset with volume down and power button. The select Yes--delete all user data.
Once format is complete reboot your device using reboot now option.
- Using Factory Reset code
How to enter into recovery mode on Samsung Galaxy S4 GT-I9500
Note: Please make sure that you back up your data and application before using these steps. Using below steps might result in to full wipe or data loss. Use at your own risk.
Using recovery mode you can do lot many things on android mobile, such as clear cache, apply update from the ADB or SDCard etc...
You can enter in the recovery mode using below steps:
- Power off your Samsung Galaxy S4.
- Press and Hold VOLUME UP, HOME button and keep pressing POWER button until phone vibrates.
- Wait until you see the Android logo and release all buttons. Keep pressing power button after vibrate might restart your mobile as default option on recovery screen.

You should see below screen once you enter the recovery mode. Use volume up & down button to select the available options and press power button to choose the option.

Error : Remove SSL protocol prefix from P4PORT
If the SSL certificate on the perforce serve is changed then you may get error "Unable to connect to server. Remove SSL protocol prefix from P4PORT" while launching the perforce client.
In order to resolve this error you will have to remove the certificate stored on the client and also remove the perforce ticket stored under user settings directory.
How to take screenshot on Samsung Galaxy S4
Capture Screen using Palm motion:
With Samsung Galaxy S4 you can capture the screenshot using the motion and gestures of the palm. To enable the motion and gesture follow below steps.
- On your Samsung Galaxy S4 go to Settings -> My device.
- On My device select Motion and gestures.
- Under Motion and gesture page enable and select Palm motions.
- Under Palm motion enable Capture Screen option.
Now you can take the screenshot using your palm motion. Once you have enabled the palm motion, click on palm motion option, will launch the tutorial of how to capture the screen using palm motion.
Capture Screen using buttons:
How to use 2G mobile data network on Samsung Galaxy S4
Samsung Galaxy S4 does not provide direct shortcut to use 2G data network as shown in below settings, as like other mobiles. To use the 2G mobile data network on Samsung Galaxy S4 you will have to follow below steps.
- On your Samsung Galaxy S4, go to Settings and select More network.
- Under Wireless and Network settings, select Mobile networks.
- On Mobile Networks setting page click select the Network Mode setting.
- On Network mode dialog you may find below choices
- WCDMA/GSM ( auto connect ) : To choose any available 3G/2G network
- WCDMA only : Use 3G only network
- GSM only : Use 2G only network
Copy Files from computer to android device using adb
You can use adb to transfer the files from the computer to your device in cases where you are not able to start the mobile in file transfer mode.
To copy a file from the computer to an android device connected via usb, use this:
To copy a file from the computer to an android device connected via usb, use this:
adb push "/path/to/local/file" "/mnt/sdcard/path/to/file"
This will copy the local file to the device in the specified location. Also using adb shell you can create directories or you can also execute some of the shell commands. Once adb is started to launch the adb shell use command
adb shell
Error : MD5 mismatch! while restoring backup using CWM
Checking MD5 sums...
MD5 mismatch!
If you are facing above error while restoring the backup using CMW then you can correct the error easily by using adb shell.
Connect your mobile to computer and start adb shell else you can use the similar commands on terminal emulator as well.
adb shell
# cd /sdcard/clockworkmod/backup/2010-06-29.20.22.53
# rm nandroid.md5
# md5sum *img > nandroid.md5
First traverse to the backup directory for which you are facing the error. Delete the existing md5 sum file( nandroid.md5). Now generate the new md5 sum for all image files in the same directory. And you are done.
Now try to restore the backup.
Subscribe to:
Posts (Atom)